Updating a SwiftUI app lifecycle
During last week WWDC, it was presented a simplified lifecycle scheme for SwiftUI apps. During the presentation if was showed how to create a new app using the new lifecycle – which is pretty easy – but how about updating an existing app? I’ve been working in a project for a new iOS app, so let’s try to update it to the new lifecycle.
New lifecycle
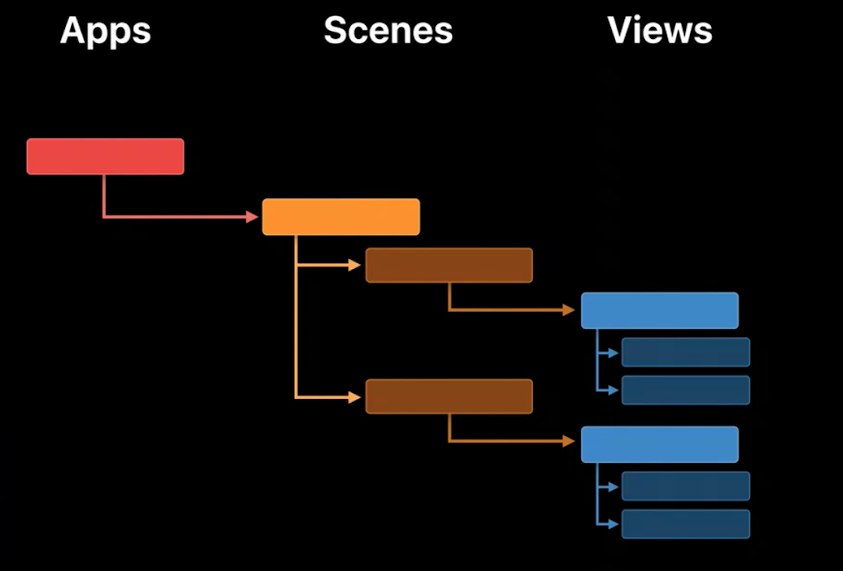
Ok, so first things first, what was the change? They introduced some new protocols that define an application: App and Scene. An App is a collection of Scenes, whereas a Scene is a collection of Views. A View is the smaller block an interface and it’s the same that we were used to since iOS 13. The image below, from the the “App essentials in SwiftUI” talk, shows how those protocols stand hierarchically.
Given that, they replaced two files – that by default came with some functions defined but were rarely touched – with a simple definition for the application’s entry point:
import SwiftUI

@main // indicates that the entry structure is this one
struct NewApp: App {
    var body: some Scene {
        MyView()
    }
}
And then, thanks to some syntax-sugary, AppDelegate.swift and SceneDelegate.swift are gone.
Updating the app
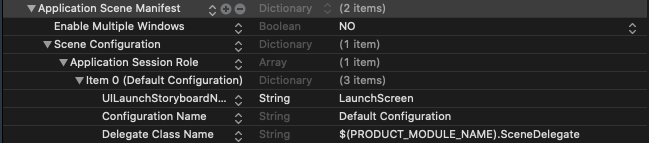
It’s tempting to just remove the files and create a new one, but we need to be careful here. On application Info.plist there’s an entry that sets the Scene Configuration, so we need to remove that from the files – just hit the minus button next to the Scene Configuration line – and update Enable Multiple Windows – I guess this enables multiple windows on iPadOS and MacOS.
After that, check if there is something extra being done in AppDelegate.swift or SceneDelegate.swift. In my case, I had some environment objects being injected in ContentView. So I added those objects into the new App struct:
@main
struct AssetsRightsApp: App {
    @StateObject private var settingsStore = SettingsStore()
    @StateObject private var stockStore = StockStore()
    @StateObject private var userData = UserData()

    var body: some Scene {
        WindowGroup {
            ContentView()
                .environmentObject(settingsStore)
                .environmentObject(stockStore)
                .environmentObject(userData)
        }
    }
}
Notice the new @StateObject property wrapper. This is different that the known @State. Instead of defining the current state of a view, @StateObject instantiates an observable object that can be later used as a EnvironmentObject.
Now yes, we can remove the old files and build the project using the new lifecycle. Beware that this has been done using Xcode 12 first beta and things can change down the road and I’m not sure how apps that run exclusively on UIKit would be affected by this.
Check the commit for this on https://github.com/gerson23/assets_rights/commit/3d24c95af41b6e21489e6c22ea62019e3a3bef38